In making an application, of course we are required to provide writings in our application. Where is the inscription can be used to provide information to users to use our application according to their needs.
Playing with Text
Widget Text() in flutter only requires us to fill in the text attribute with type data string to add text to the UI. Like this for example.
import 'package:flutter/material.dart';

   const Color darkBlue = Color. fromARGB(255, 18, 32, 47);

   void main() {
     runApp(MyApp());
   }

   class MyApp extends StatelessWidget {
     @override
     Widget build(BuildContext context) {
       return MaterialApp(
         theme: ThemeData.dark().copyWith(
           scaffoldBackgroundColor: darkBlue,
         ),
         debugShowCheckedModeBanner: false,
         home: const Scaffold(
           body: Center(
             //example text code
             child: Text('hello world'),
           ),
         ),
       );
     }
   }
output:

Text Coloring
In flutter we can color text in the following way.
import 'package:flutter/material.dart';

   const Color darkBlue = Color. fromARGB(255, 18, 32, 47);

   void main() {
     runApp(MyApp());
   }

   class MyApp extends StatelessWidget {
     @override
     Widget build(BuildContext context) {
       return MaterialApp(
         theme: ThemeData.dark().copyWith(
           scaffoldBackgroundColor: darkBlue,
         ),
         debugShowCheckedModeBanner: false,
         home: const Scaffold(
           body: Center(
             //example text code
             child: Text('hello world', style: TextStyle(color: Colors.blue)), //coloring and styling are in the `color` attribute of `TextStyle`
           ),
         ),
       );
     }
   }
output:

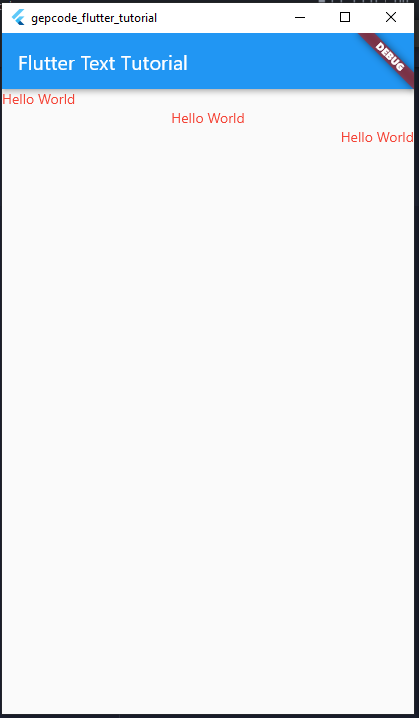
Text Alignment
For text alignment, I'll show you how to align text to the left, right or center. See code in bottom
   import 'package:flutter/material. dart';

   void main() {
     runApp(const MyApp());
   }

   class MyApp extends StatelessWidget {
     const MyApp({Key? key}) : super(key: key);

     // This widget is the root of your application.
     @override
     Widget build(BuildContext context) {
       return MaterialApp(
         title: 'Flutter Demo',
         theme: ThemeData(
           primarySwatch: Colors. blue,
         ),
         home: const MyHomePage(title: 'Flutter Text Tutorial'),
       );
     }
   }

   class MyHomePage extends StatelessWidget {
     final String title;
     const MyHomePage({Key? key, required this. title}) : super(key: key);

     @override
     Widget build(BuildContext context) {
       return Scaffold(
         appBar: AppBar(
           title: Text(title),
         ),
         body: Aligned(
           child: Column(
             crossAxisAlignment: CrossAxisAlignment.start,
             children: [
               SizedBox(
                 width: MediaQuery.of(context).size.width,
                 child: constText(
                   'Hello World',
                   style: TextStyle(
                     color: Colors. red,
                   ),
                 ), // by default it will be left aligned
               ),
               SizedBox(
                 width: MediaQuery.of(context).size.width,
                 child: constText(
                   'Hello World',
                   style: TextStyle(
                     color: Colors. red,
                   ),
                   textAlign: TextAlign. center, // centered
                 ),
               ),
               SizedBox(
                 width: MediaQuery.of(context).size.width,
                 child: constText(
                   'Hello World',
                   style: TextStyle(color: Colors. red),
                   textAlign: TextAlign.end, // right align
                 ),
               )
             ],
           ),
         ),
       );
     }
   }
output:
Text Overflow (Text Overflow)
In designing, we can find various reasons why this is necessary. When the text overflows exceed width of the parent, sometimes a front end developer will get a protest from the UI reviewer. Let we start from handling text.
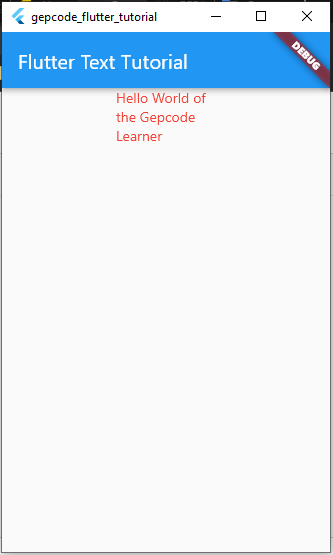
1. Unhandled Text Overflow
By default if you don't provide an option for text that overflows, then the text is automatic will decrease to bottom if it exceeds parent width, Let's look at the following code.
import 'package:flutter/material.dart';

   void main() {
     runApp(const MyApp());
   }

   class MyApp extends StatelessWidget {
     const MyApp({Key? key}) : super(key: key);

     // This widget is the root of your application.
     @override
     Widget build(BuildContext context) {
       return MaterialApp(
         title: 'Flutter Demo',
         theme: ThemeData(
           primarySwatch: Colors. blue,
         ),
         home: const MyHomePage(title: 'Flutter Text Tutorial'),
       );
     }
   }

   class MyHomePage extends StatelessWidget {
     final String title;
     const MyHomePage({Key? key, required this. title}) : super(key: key);

     @override
     Widget build(BuildContext context) {
       return Scaffold(
         appBar: AppBar(
           title: Text(title),
         ),
         body: SizedBox(
           width: double. infinity,
           child: Column(
             crossAxisAlignment: CrossAxisAlignment.center,
             children: const [
               SizedBox(
                 width: 100,
                 child:Text(
                   'Hello World of the Gepcode Learner',
                   style: TextStyle(
                     color: Colors. red,
                   ),
                 ),
               ),
             ],
           ),
         ),
       );
     }
   }
Output:
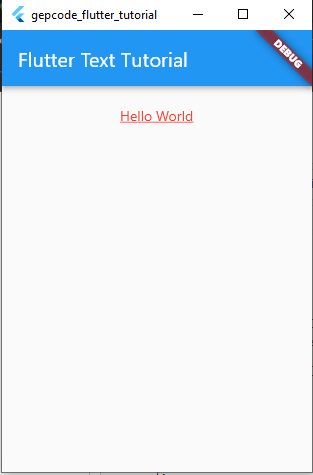
2. Text Overflow Ellipses
This
text overflow creates text ... in a text that overflows from its parent. let's see the code in down.
import 'package:flutter/material.dart';

   void main() {
     runApp(const MyApp());
   }

   class MyApp extends StatelessWidget {
     const MyApp({Key? key}) : super(key: key);

     // This widget is the root of your application.
     @override
     Widget build(BuildContext context) {
       return MaterialApp(
         title: 'Flutter Demo',
         theme: ThemeData(
           primarySwatch: Colors. blue,
         ),
         home: const MyHomePage(title: 'Flutter Text Tutorial'),
       );
     }
   }

   class MyHomePage extends StatelessWidget {
     final String title;
     const MyHomePage({Key? key, required this. title}) : super(key: key);

     @override
     Widget build(BuildContext context) {
       return Scaffold(
         appBar: AppBar(
           title: Text(title),
         ),
         body: SizedBox(
           width: double. infinity,
           child: Columns(
             crossAxisAlignment: CrossAxisAlignment.center,
             children: const [
               SizedBox(
                 width: 100,
                 child:Text(
                   'Hello World of the Gepcode Learner',
                   style: TextStyle(
                     color: Colors. red,
                   ),
                   overflow: TextOverflow.ellipsis, //example of ellipsis text overflow
                 ),
               ),
             ],
           ),
         ),
       );
     }
   }
Output

3. Text Overflow Fade with Maxline = 1
Text overflow fade, causes part of the text to become transparent when it overflows. Let's take a look at the code in down.
import 'package:flutter/material.dart';

   void main() {
     runApp(const MyApp());
   }

   class MyApp extends StatelessWidget {
     const MyApp({Key? key}) : super(key: key);

     // This widget is the root of your application.
     @override
     Widget build(BuildContext context) {
       return MaterialApp(
         title: 'Flutter Demo',
         theme: ThemeData(
           primarySwatch: Colors. blue,
         ),
         home: const MyHomePage(title: 'Flutter Text Tutorial'),
       );
     }
   }

   class MyHomePage extends StatelessWidget {
     final String title;
     const MyHomePage({Key? key, required this. title}) : super(key: key);

     @override
     Widget build(BuildContext context) {
       return Scaffold(
         appBar: AppBar(
           title: Text(title),
         ),
         body: SizedBox(
           width: double. infinity,
           child: Column(
             crossAxisAlignment: CrossAxisAlignment.center,
             children: const [
               SizedBox(
                 width: 100,
                 child:Text(
                   'Hello World of the Gepcode Learner',
                   style: TextStyle(
                     color: Colors. red,
                     fontSize: 30, // fontsize example
                   ),
                   maxLines: 1, // example maxlines
                   overflow: TextOverflow. fade,
                 ),
               ),
             ],
           ),
         ),
       );
     }
   }
Output
Maybe that's all from me. Thank you