Dalam pembuatan aplikasi, pastinya kita diharuskan memberikan tulisan-tulisan pada aplikasi kita. Dimana tulisan itu dapat digunakan untuk memberikan informasi kepada pengguna untuk menggunakan aplikasi kita sesuai kebutuhan mereka.
Bermain dengan Text
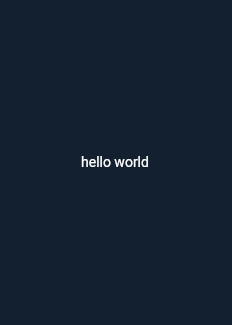
Widget Text() pada flutter hanya mewajibkan kita mengisi attribute text yang bertipe data string untuk memberi tulisan pada UI. Seperti ini contohnya.
import 'package:flutter/material.dart';
const Color darkBlue = Color.fromARGB(255, 18, 32, 47);
void main() {
runApp(MyApp());
}
class MyApp extends StatelessWidget {
@override
Widget build(BuildContext context) {
return MaterialApp(
theme: ThemeData.dark().copyWith(
scaffoldBackgroundColor: darkBlue,
),
debugShowCheckedModeBanner: false,
home: const Scaffold(
body: Center(
//contoh kode text
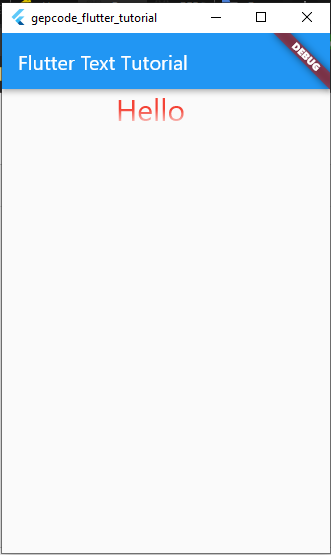
child: Text('hello world'),
),
),
);
}
}
output:
Text Coloring (Pewarnaan Teks)
Dalam flutter kita juga bisa mewarnai text dengan cara seperti berikut.
import 'package:flutter/material.dart';

const Color darkBlue = Color.fromARGB(255, 18, 32, 47);

void main() {
  runApp(MyApp());
}

class MyApp extends StatelessWidget {
  @override
  Widget build(BuildContext context) {
    return MaterialApp(
      theme: ThemeData.dark().copyWith(
        scaffoldBackgroundColor: darkBlue,
      ),
      debugShowCheckedModeBanner: false,
      home: const Scaffold(
        body: Center(
          //contoh kode text
          child: Text('hello world', style: TextStyle(color: Colors.blue)), //pewarnaan dan styling ada pada attribute `color` pada `TextStyle`
        ),
      ),
    );
  }
}
output:

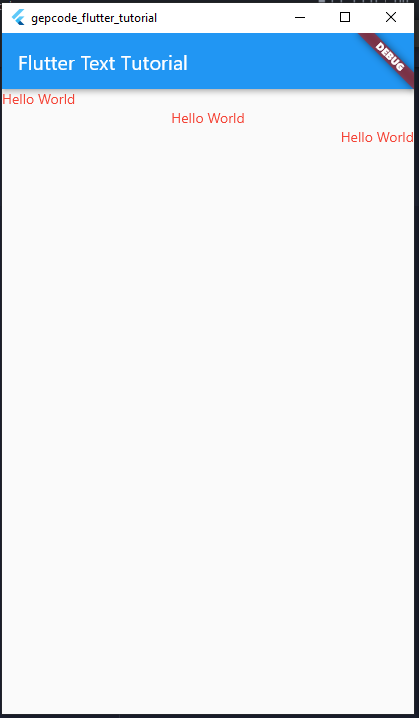
Text Alignment (Perataan Teks)
untuk perataan text, saya tunjukan bagaimana cara meratakan text ke rata kiri, kanan atau tengah. Lihat kode di bawah
import 'package:flutter/material.dart';

void main() {
  runApp(const MyApp());
}

class MyApp extends StatelessWidget {
  const MyApp({Key? key}) : super(key: key);

  // This widget is the root of your application.
  @override
  Widget build(BuildContext context) {
    return MaterialApp(
      title: 'Flutter Demo',
      theme: ThemeData(
        primarySwatch: Colors.blue,
      ),
      home: const MyHomePage(title: 'Flutter Text Tutorial'),
    );
  }
}

class MyHomePage extends StatelessWidget {
  final String title;
  const MyHomePage({Key? key, required this.title}) : super(key: key);

  @override
  Widget build(BuildContext context) {
    return Scaffold(
      appBar: AppBar(
        title: Text(title),
      ),
      body: Align(
        child: Column(
          crossAxisAlignment: CrossAxisAlignment.start,
          children: [
            SizedBox(
              width: MediaQuery.of(context).size.width,
              child: const Text(
                'Hello World',
                style: TextStyle(
                  color: Colors.red,
                ),
              ), // secara default akan rata kiri
            ),
            SizedBox(
              width: MediaQuery.of(context).size.width,
              child: const Text(
                'Hello World',
                style: TextStyle(
                  color: Colors.red,
                ),
                textAlign: TextAlign.center, // rata tengah
              ),
            ),
            SizedBox(
              width: MediaQuery.of(context).size.width,
              child: const Text(
                'Hello World',
                style: TextStyle(color: Colors.red),
                textAlign: TextAlign.end, // rata kanan
              ),
            )
          ],
        ),
      ),
    );
  }
}
output:
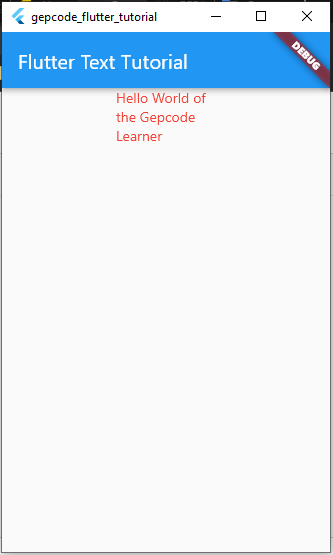
Text Overflow (Text yang Meluap)
Dalam pembuatan design, kita bisa menjumpai berbagai alasan kenapa hal ini diperlukan. Ketika text meluap melebihi lebar parent-nya maka terkadang seorang front end developer akan mendapatkan protes dari sisi UI reviewer. Mari kita mulai dari menghandle text.
1. Unhandled Text Overflow
Secara default jika anda tidak memberikan opsi untuk text yang overflow, maka text tersebut otomatis akan menurun ke bawah jika melebihi parent width, Mari kita lihat kode berikut.
import 'package:flutter/material.dart';

void main() {
  runApp(const MyApp());
}

class MyApp extends StatelessWidget {
  const MyApp({Key? key}) : super(key: key);

  // This widget is the root of your application.
  @override
  Widget build(BuildContext context) {
    return MaterialApp(
      title: 'Flutter Demo',
      theme: ThemeData(
        primarySwatch: Colors.blue,
      ),
      home: const MyHomePage(title: 'Flutter Text Tutorial'),
    );
  }
}

class MyHomePage extends StatelessWidget {
  final String title;
  const MyHomePage({Key? key, required this.title}) : super(key: key);

  @override
  Widget build(BuildContext context) {
    return Scaffold(
      appBar: AppBar(
        title: Text(title),
      ),
      body: SizedBox(
        width: double.infinity,
        child: Column(
          crossAxisAlignment: CrossAxisAlignment.center,
          children: const [
            SizedBox(
              width: 100,
              child: Text(
                'Hello World of the Gepcode Learner',
                style: TextStyle(
                  color: Colors.red,
                ),
              ),
            ),
          ],
        ),
      ),
    );
  }
}
Output:
2. Text Overflow Elipsis
text overflow ini membuat text ... pada sebuah text yang meluap dari parentnya. mari kita lihat kode di bawah.
import 'package:flutter/material.dart';

void main() {
  runApp(const MyApp());
}

class MyApp extends StatelessWidget {
  const MyApp({Key? key}) : super(key: key);

  // This widget is the root of your application.
  @override
  Widget build(BuildContext context) {
    return MaterialApp(
      title: 'Flutter Demo',
      theme: ThemeData(
        primarySwatch: Colors.blue,
      ),
      home: const MyHomePage(title: 'Flutter Text Tutorial'),
    );
  }
}

class MyHomePage extends StatelessWidget {
  final String title;
  const MyHomePage({Key? key, required this.title}) : super(key: key);

  @override
  Widget build(BuildContext context) {
    return Scaffold(
      appBar: AppBar(
        title: Text(title),
      ),
      body: SizedBox(
        width: double.infinity,
        child: Column(
          crossAxisAlignment: CrossAxisAlignment.center,
          children: const [
            SizedBox(
              width: 100,
              child: Text(
                'Hello World of the Gepcode Learner',
                style: TextStyle(
                  color: Colors.red,
                ),
                overflow: TextOverflow.ellipsis, //contoh text overflow elipsis
              ),
            ),
          ],
        ),
      ),
    );
  }
}
Output

3. Text Overflow Fade dengan Maxline = 1
Text overflow fade, menybabkan sebagian dari text akan menjadi transparent saat meluap. Mari kita lihat kode di bawah.
import 'package:flutter/material.dart';

void main() {
  runApp(const MyApp());
}

class MyApp extends StatelessWidget {
  const MyApp({Key? key}) : super(key: key);

  // This widget is the root of your application.
  @override
  Widget build(BuildContext context) {
    return MaterialApp(
      title: 'Flutter Demo',
      theme: ThemeData(
        primarySwatch: Colors.blue,
      ),
      home: const MyHomePage(title: 'Flutter Text Tutorial'),
    );
  }
}

class MyHomePage extends StatelessWidget {
  final String title;
  const MyHomePage({Key? key, required this.title}) : super(key: key);

  @override
  Widget build(BuildContext context) {
    return Scaffold(
      appBar: AppBar(
        title: Text(title),
      ),
      body: SizedBox(
        width: double.infinity,
        child: Column(
          crossAxisAlignment: CrossAxisAlignment.center,
          children: const [
            SizedBox(
              width: 100,
              child: Text(
                'Hello World of the Gepcode Learner',
                style: TextStyle(
                  color: Colors.red,
                  fontSize: 30, // contoh fontsize
                ),
                maxLines: 1, // contoh max line
                overflow: TextOverflow.fade,
              ),
            ),
          ],
        ),
      ),
    );
  }
}
Output
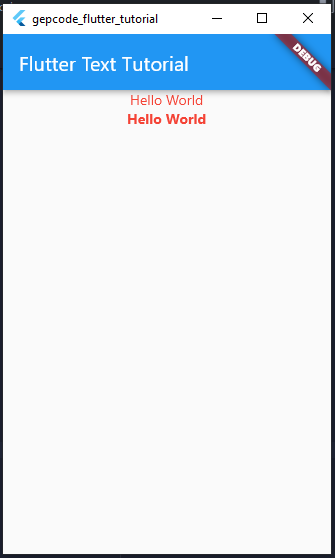
Font Weight (Ketebalan Font)
Langsung saja kita praktikkan, perbandingan font yang tanpa font weight dan font yang menggunakan font weight bold.
import 'package:flutter/material.dart';

void main() {
  runApp(const MyApp());
}

class MyApp extends StatelessWidget {
  const MyApp({Key? key}) : super(key: key);

  // This widget is the root of your application.
  @override
  Widget build(BuildContext context) {
    return MaterialApp(
      title: 'Flutter Demo',
      theme: ThemeData(
        primarySwatch: Colors.blue,
      ),
      home: const MyHomePage(title: 'Flutter Text Tutorial'),
    );
  }
}

class MyHomePage extends StatelessWidget {
  final String title;
  const MyHomePage({Key? key, required this.title}) : super(key: key);

  @override
  Widget build(BuildContext context) {
    return Scaffold(
      appBar: AppBar(
        title: Text(title),
      ),
      body: SizedBox(
        width: double.infinity,
        child: Column(
          crossAxisAlignment: CrossAxisAlignment.center,
          children: const [
            Text(
              'Hello World',
              style: TextStyle(
                color: Colors.red,
                fontSize: 14,
              ),
            ),
            Text(
              'Hello World',
              style: TextStyle(
                color: Colors.red,
                fontSize: 14,
                fontWeight: FontWeight.bold, //bold
              ),
            ),
          ],
        ),
      ),
    );
  }
}
output
Text Decoration (Dekorasi Teks)
Pada flutter, text bisa diberikan dekorasi selayaknya HTML. Mari kita lihat beberapa tipe dekorasi teks di bawah
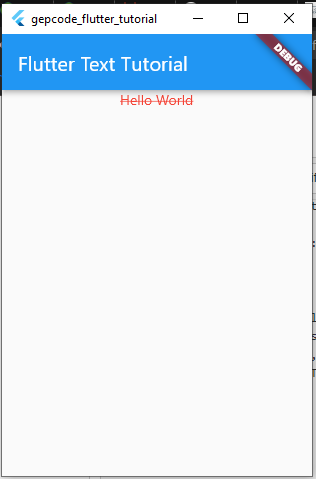
1. LineThrough
Dekorasi ini memberikan coretan pada tengah text, anda bisa melihat contoh di bawah.
import 'package:flutter/material.dart';

void main() {
  runApp(const MyApp());
}

class MyApp extends StatelessWidget {
  const MyApp({Key? key}) : super(key: key);

  // This widget is the root of your application.
  @override
  Widget build(BuildContext context) {
    return MaterialApp(
      title: 'Flutter Demo',
      theme: ThemeData(
        primarySwatch: Colors.blue,
      ),
      home: const MyHomePage(title: 'Flutter Text Tutorial'),
    );
  }
}

class MyHomePage extends StatelessWidget {
  final String title;
  const MyHomePage({Key? key, required this.title}) : super(key: key);

  @override
  Widget build(BuildContext context) {
    return Scaffold(
      appBar: AppBar(
        title: Text(title),
      ),
      body: SizedBox(
        width: double.infinity,
        child: Column(
          crossAxisAlignment: CrossAxisAlignment.center,
          children: const [
            Text(
              'Hello World',
              style: TextStyle(
                color: Colors.red,
                fontSize: 14,
                decoration: TextDecoration.lineThrough,
              ),
            ),
          ],
        ),
      ),
    );
  }
}
Output:
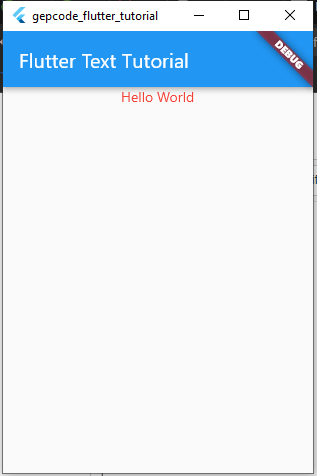
2. none
Tanpa dekorasi teks
import 'package:flutter/material.dart';

void main() {
  runApp(const MyApp());
}

class MyApp extends StatelessWidget {
  const MyApp({Key? key}) : super(key: key);

  // This widget is the root of your application.
  @override
  Widget build(BuildContext context) {
    return MaterialApp(
      title: 'Flutter Demo',
      theme: ThemeData(
        primarySwatch: Colors.blue,
      ),
      home: const MyHomePage(title: 'Flutter Text Tutorial'),
    );
  }
}

class MyHomePage extends StatelessWidget {
  final String title;
  const MyHomePage({Key? key, required this.title}) : super(key: key);

  @override
  Widget build(BuildContext context) {
    return Scaffold(
      appBar: AppBar(
        title: Text(title),
      ),
      body: SizedBox(
        width: double.infinity,
        child: Column(
          crossAxisAlignment: CrossAxisAlignment.center,
          children: const [
            Text(
              'Hello World',
              style: TextStyle(
                color: Colors.red,
                fontSize: 14,
                decoration: TextDecoration.none,
              ),
            ),
          ],
        ),
      ),
    );
  }
}
Output
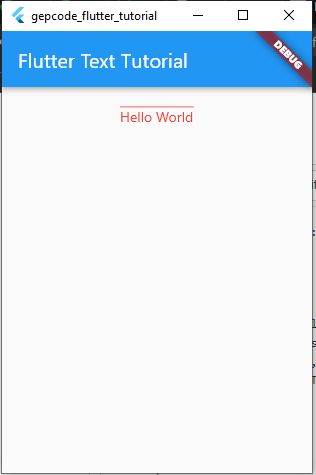
3. Overline
Teks dekorasi ini memberikan garis di atas teks.
import 'package:flutter/material.dart';

void main() {
  runApp(const MyApp());
}

class MyApp extends StatelessWidget {
  const MyApp({Key? key}) : super(key: key);

  // This widget is the root of your application.
  @override
  Widget build(BuildContext context) {
    return MaterialApp(
      title: 'Flutter Demo',
      theme: ThemeData(
        primarySwatch: Colors.blue,
      ),
      home: const MyHomePage(title: 'Flutter Text Tutorial'),
    );
  }
}

class MyHomePage extends StatelessWidget {
  final String title;
  const MyHomePage({Key? key, required this.title}) : super(key: key);

  @override
  Widget build(BuildContext context) {
    return Scaffold(
      appBar: AppBar(
        title: Text(title),
      ),
      body: SizedBox(
        width: double.infinity,
        child: Column(
          crossAxisAlignment: CrossAxisAlignment.center,
          children: const [
            SizedBox(height: 20),
            Text(
              'Hello World',
              style: TextStyle(
                color: Colors.red,
                fontSize: 14,
                decoration: TextDecoration.overline,
              ),
            ),
          ],
        ),
      ),
    );
  }
}
output:
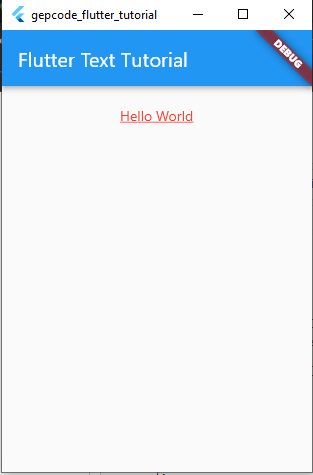
4. Underline
Teks dekorasi ini memberikan garis di bawah text
import 'package:flutter/material.dart';

void main() {
  runApp(const MyApp());
}

class MyApp extends StatelessWidget {
  const MyApp({Key? key}) : super(key: key);

  // This widget is the root of your application.
  @override
  Widget build(BuildContext context) {
    return MaterialApp(
      title: 'Flutter Demo',
      theme: ThemeData(
        primarySwatch: Colors.blue,
      ),
      home: const MyHomePage(title: 'Flutter Text Tutorial'),
    );
  }
}

class MyHomePage extends StatelessWidget {
  final String title;
  const MyHomePage({Key? key, required this.title}) : super(key: key);

  @override
  Widget build(BuildContext context) {
    return Scaffold(
      appBar: AppBar(
        title: Text(title),
      ),
      body: SizedBox(
        width: double.infinity,
        child: Column(
          crossAxisAlignment: CrossAxisAlignment.center,
          children: const [
            SizedBox(height: 20),
            Text(
              'Hello World',
              style: TextStyle(
                color: Colors.red,
                fontSize: 14,
                decoration: TextDecoration.underline,
              ),
            ),
          ],
        ),
      ),
    );
  }
}
Output
Demikian hal yang mungkin banyak kurangnya mari kita lanjut ke artikel berikutnya. Terimakasih